Open source should be a team sport. Since you’re free to download the code and rewrite it to fit your needs, you should also feel free to share your customizations with your closest friends and family. Over the years, Linux, the centerpiece of the open source world, has been spun into hundreds of distributions (or, “distros’ as they’re more commonly called). Think there’s an underserved niche no one else has addressed? Does your own business need a purpose-built OS environment to fit its unique workflow? Then by all means, customize away.
Creating your own distro doesn’t mean you’ll have to crack open the kernel and fight your way through arcane system calls and ISAs. You can simply install your own software, reset some environment variables, or just install a couple of customizing scripts and, assuming your name is Linda, you can call it Lindux (but that’s your call).
Still, no matter how simple your distro turns out, getting it all packaged up into an ISO archive to share with the world can get really complicated, really fast. Don’t believe me? Just search the internet for guides and tools to “build your own Linux distro” and note how many there are, how many steps each requires, and also how many of the tools have been abandoned as new upgrades to a base distro render them useless.
I’m not trying to discourage you. If you’ve got the new distro bug and you’re up to the challenge, by all means, dive in and build us a great one using traditional tools. But if all you’re after is a custom-built Linux server image that will run in the AWS cloud, then there’s a much simpler approach.
As I describe in some detail in my new Manning book “Learn Amazon Web Services in a Month of Lunches,” the basic virtual machine powering many AWS workloads is the Elastic Compute Cloud (EC2) server instance. EC2 instances come with a nice range of operating systems pre-installed, but the overwhelming majority are running one flavor or another of Linux.

So here’s what you can do:
- Select and launch an EC2 instance built with your choice of Linux distributions. This will be the base for your own distro.
- Log into your instance using SSH and install the software and environment settings you’ll need for your own distro.
- Create an image of your instance (which will effectively be a perfect copy of the instance’s current state). As an Amazon Machine Image (AMI), this image could be made publicly available for anyone to launch within their own AWS accounts. Or you could keep it private to share just among your own team members.
Effectively, the AWS AMI becomes a single tool for both packaging and distributing your image all wrapped up in one. Perhaps it’s not quite 100% accurate to call what comes out the other end a distro – and it’s pretty useless if you‘re looking to provide a desktop GUI experience – but it will work a whole lot faster and easier than just about any alternative.
How does it all work? Here’s the short version. Select the running EC2 instance you want to copy in the EC2 Instances dashboard. Then click Actions, and select Image and then Create Image.
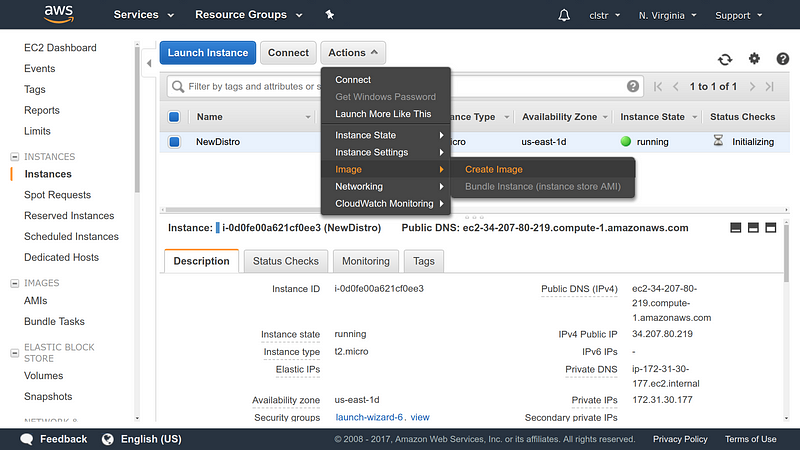
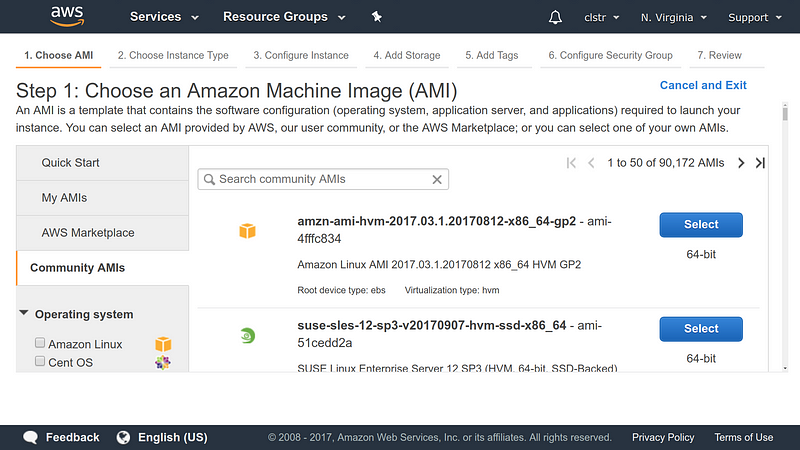
After a few minutes, a new image should appear on the AMI s page of the EC2 dashboard. The next time you launch a new instance from the EC2 dashboard and arrive at the Choose an Amazon Machine Image page, click the My AMIs tab: your new AMI should be there, waiting to be selected. If you chose to make your image public, then other users will find it in the Community AMIs tab.
But where’s the fun in that? If you want to play like the pros, you’ll install and authenticate the AWS CLI and run this through their API.
This is how you’d launch an AMI image by referencing the image ID (as far as I know, this one isn’t active, by the way):
$ aws ec2 run-instances --image-id ami-5cf5c74b \
--count 1 --instance-type t2.micro \
--key-name mykey --security-group-ids sg-7a4d6200
Let’s go through that one step at a time:
- aws ec2 run-instances runs a new instance whose details will follow.
- image-id ami-5cf5c74b identifies the AMI ’s ID . You can get this information from the AMI page of the EC2 dashboard, or from the
CLI using
aws ec2 describe-images --owners self .
- count 1 specifies that you want to launch only one instance of this image.
- instance-type t2.micro is the instance type.
- key-name mykey is the name of the key pair you’ll use to access the instance once it’s running. This example uses plural — a key-
name example from a previous chapter. - security-groups sg-7a4d6200 is the name of an existing security group you’ll use; you can find it using aws ec2 describe-security-groups . The ID displayed here is unique to the group in my account’s VPC . You’ll need to use a group ID from your own account.
Head back to the Console. You’ll see your new instance initializing, and eventually you’ll see a new copy of your Linux “distro” happily running.
This article is partly adapted from my Manning “Learn Amazon Web Services in a Month of Lunches” book. It was also published on Medium. And there’s more where this came from. Check out my other books.