In the beginning there was the FreeBSD – and later Linux – chroot jail. Chroot was a way to bring an unmounted file system to life so you could execute commands as though it was actually running on its own host. Then came the Linux Containers project (LXC and LXD) that added network and storage configurations to run jails (now more commonly called containers) within appropriately isolated and optimized environments.
And then there was Docker. Docker containers streamlined container operations so that software resources used by multiple containers could be efficiently shared. They also added online public repositories populated by vast collections of software tools. But the real value of Docker was in how easy it made deploying reliably predictable application environments.
What Kubernetes Brings to the Table
Then, out of the mists of time appeared Kubernetes. While originally developed within Google, Kubernetes has since been released as open source software under the control of the Cloud Native Computing Foundation.
At its heart, Kubernetes manages containers just the way Docker does. But Kubernetes adds a vast ecosystem of scaling, load balancing, network proxying, and multi-node administration tools to the mix. Docker’s own Swarm comes with a comparable suite of tools, but Kubernetes has, so far at least, proven far more popular.
Kubernetes is much more of a native enterprise-scale tool than Docker Swarm. It’s not that Docker Swarm can’t be used in the enterprise – it certainly can – it’s that Kubernetes isn’t necessarily such a great fit for a quick and dirty local development environment. The main reason is that, at this point at any rate, you need an existing cluster before you can get anything to happen, and creating a local cluster requires a running hypervisor of one flavor or another. So having a public cloud like AWS where you can freely provision all the bits and pieces that go into a cluster without having to worry about infrastructure, matters more for Kubernetes than it does for Docker in general.
Kubernetes’ larger resource footprint and steeper learning curve can be offset by some impressive integration: working with persistent storage volumes is straightforward. And robust deployment monitoring solutions are easily available.
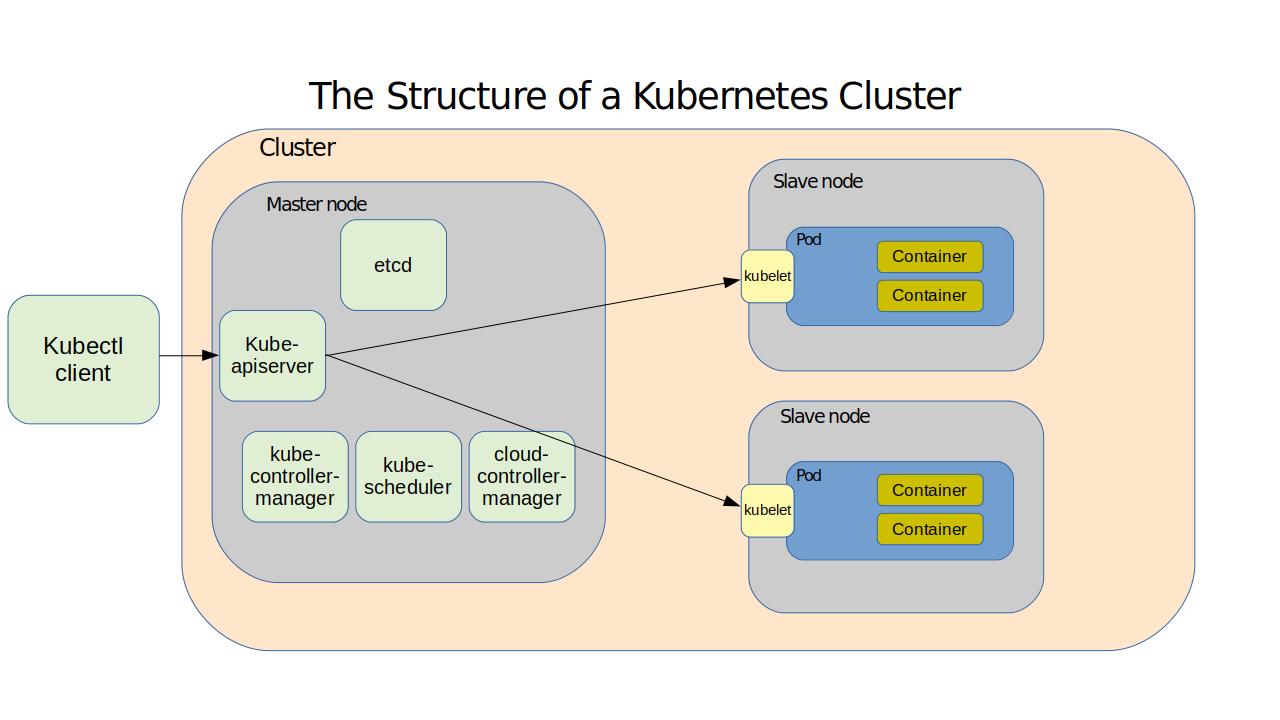
A Quick Look at the Kubernetes Cluster
Here – based on content from my Pluralsight course, “Using Docker on AWS” – is how Kubernetes works. A cluster is made up of the networking, storage, and compute resources that your workloads will use. The cluster’s physical or virtual computers – called nodes – serve as either masters or slaves. A master runs the services that manage all cluster operations. The master itself is managed through the kube-apiserver service which responds to instructions you send to it using the kubectl client software. The master also hosts:
• A database of cluster configuration known as etcd
• kube-controller-manager, that measures the current state of a cluster
against its desired state
• kube-scheduler, which balances configuration specifications against avail-
able resources
• The cloud-controller-manager that provides critical integration with public
cloud providers like AWS
Nodes are controlled by software agents called kubelets and maintain reliable and secure network connectivity through the kube-proxy service. Important stuff – your actual application workload – happens on the nodes within pods, which are organizing structures within which the application containers themselves run. Multiple containers can run on a pod, all sharing a single IP address and compute resources – providing a single instance of your application.
The good news is that the kubectl software is smart enough to simply read your YAML configuration document and use it to bring all the details to life without your help. If you want to become a successful Kubernetes admin you really should understand all these details. But you can be forgiven for being a bit relaxed about it all in the meantime: most of the action takes place invisibly, hidden by the relatively simple command set we’ll soon see.
A Quick Kubernetes Installation
Just so you can’t say I didn’t show you anything practical here, let’s install the lightweight Kubernetes version, MicroK8s, on a Linux machine. All you’ll need for this in-and-out exercise is a working copy of the Snaps package manager. This single command will install all the core services, libraries, and binaries necessary for small, proof-of-concept demos.
snap install microk8s --classicJust to prove that the installation succeeded, ask the service to list all the nodes
that are currently running. Of course, there won’t be any of those yet.
$ sudo microk8s.kubectl get nodes
No resources found.
There will, however, be a single service with a private IP address associated with
it:
$ sudo microk8s.kubectl get services
NAME         TYPE        CLUSTER-IP     EXTERNAL-IP   PORT(S)   AGE
kubernetes   ClusterIP   10.152.183.1   <none>        443/TCP   80s
Finally, you can enable the browser-based Kubernetes administration dashboard using this microk8s.enable command. The output you’ll get will include extra instructions for displaying and using the authentication token you’ll need to connect.
$ sudo microk8s.enable dns dashboard
Enabling DNS
Applying manifest
serviceaccount/coredns created
configmap/coredns created
[...]
If RBAC is not enabled access the dashboard using the default token retrieved with:

token=$(microk8s.kubectl -n kube-system get secret | grep default-token | cut -d " " -f1)
microk8s.kubectl -n kube-system describe secret $token
In an RBAC enabled setup (microk8s.enable RBAC) you need to create a user with restricted permissions as shown in https://github.com/kubernetes/dashboard/wiki/Creating-sample-user
This article is based on content in my Pluralsight course, “Using Docker on AWS.” There’s much more administration goodness in the form of books, courses, and articles available at bootstrap-it.com.