Container virtualization — most visibly represented by Docker — is a
server paradigm that will likely drive enterprise computing for years
to come.
The Cloud is the most obvious and logical platform for container
deployment.
Amazon Web Services largely dominates the cloud computing world.
Add it up. If you’re interested in getting a piece of all this action, you’ll
definitely want to figure out how it all works.
First, though, let’s quickly define some key terms.
Virtualization
Virtualization is the division of physical computer and networking resources into smaller, more flexible units, presenting these smaller units to users as though each was a discrete resource.
The idea is that, instead of assigning specific computing tasks to individual physical servers — which may sometimes end up being over- or underused
— a single physical server can be logically divided into as few or as many virtual servers as needed.
That means, as the figure below illustrates, there can be dozens of individually installed operating systems (OS) running side by side on the same hard drive. Each OS is effectively unaware that it isn’t all alone in its local environment.
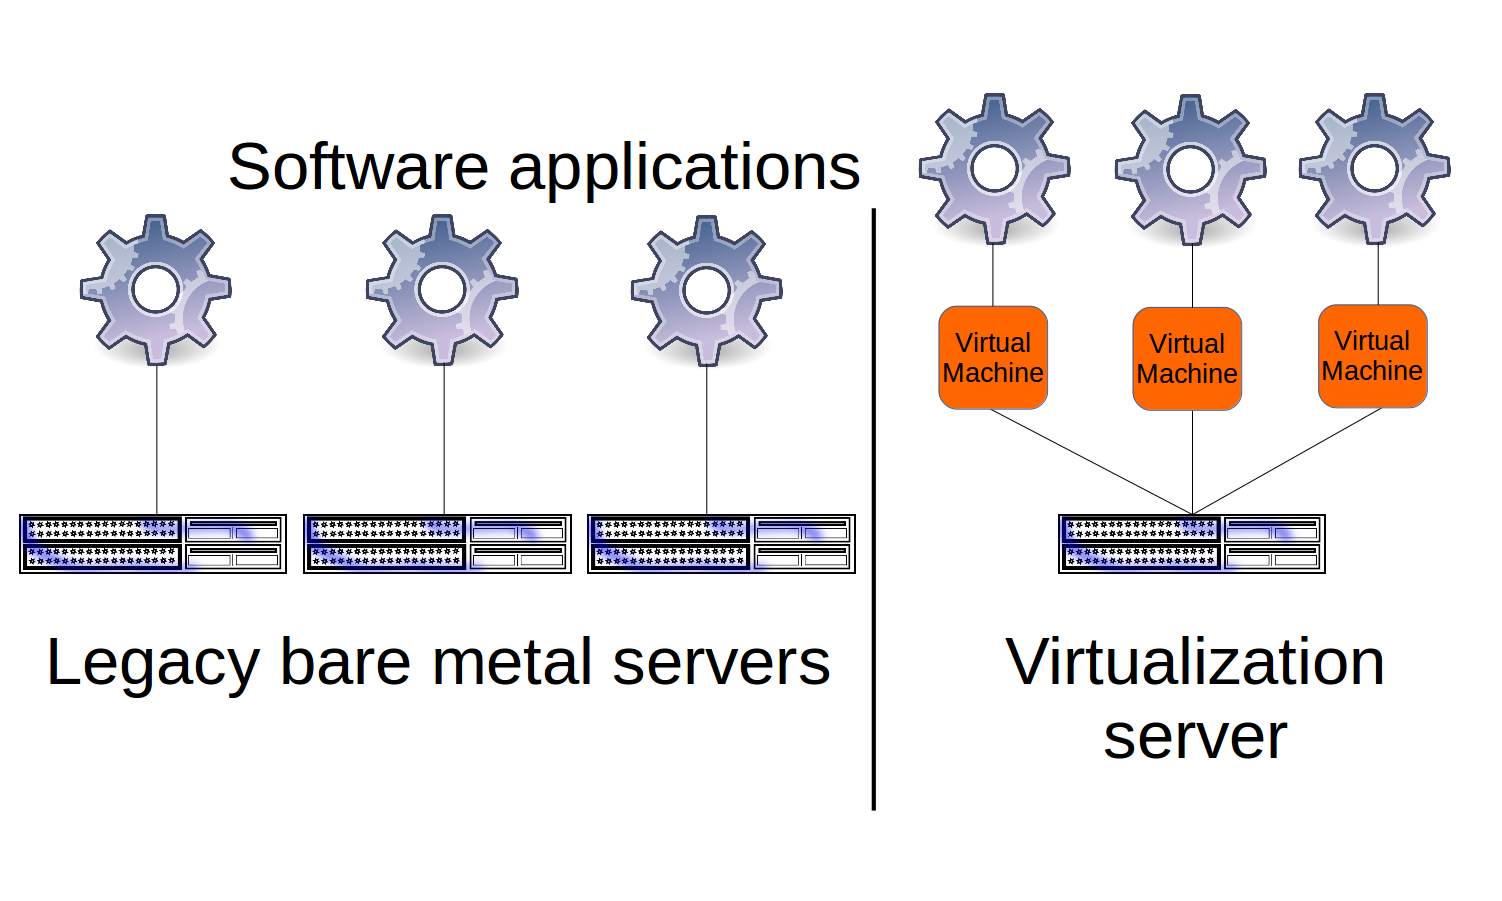
Practically, each operating system instance can be accessed remotely by both administrators and customers in exactly the same way as any other server.
In this kind of environment, as soon as your virtual server completes its task or becomes unnecessary, you can instantly delete it. This will free up the resources it was using for the next task in the queue.
There’s no need to over-provision virtual servers to anticipate possible future needs, because future needs can be easily met whenever they arrive.
In fact, today’s virtual server might only live a few minutes or even seconds before, having completed its task, being shut down for good to make room for whatever’s next. All this allows for far more efficient use of expensive hardware. It provides the ability to provision and launch new servers at will, either to test new configurations or add fresh power to your production services.
Cloud computing providers like AWS use virtualized computers of one kind or another. The hundreds of thousands of Amazon EC2 instances, for example, all run on top of the open source Xen or KVM hypervisors — which are themselves installed and running on many thousands of physical servers maintained in Amazon’s vast server farms.
Whatever hypervisor technology is being used, the goal is to provide a largely automated hosting environment for multiple complete, self-contained virtual computers.
Containers like Docker, on the other hand, aren’t standalone virtual machines but are modified file systems sharing the operating system kernel of their physical host. That’s what we’ll discuss next.
Containers
What are containers? Well, for one thing, they’re not hypervisors. Instead, they’re extremely lightweight virtual servers that, as you can see from the figure, rather than running as full operating systems, share the underlying kernel of their host OS.
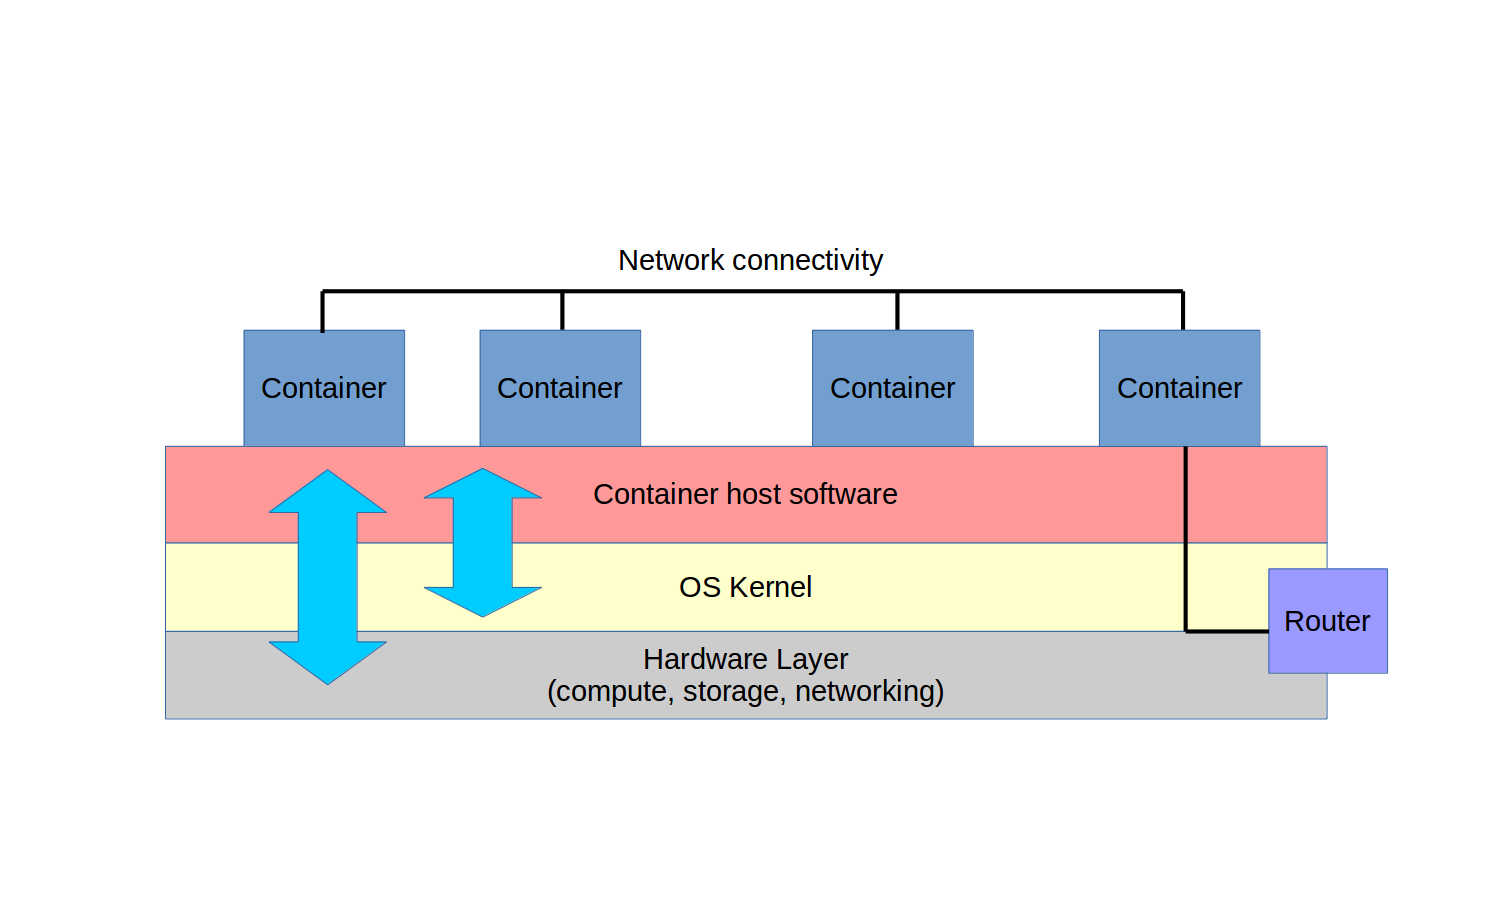
Containers can be built from plain-text scripts, created and launched in seconds, and easily and reliably shared across networks. Container technologies include the Linux Container project, which was Docker’s original inspiration.
The script-friendly container design makes it easy to automate and remotely manage complex clusters of containers, often deployed as microservices.
Microservices is a compute services architecture where multiple containers are deployed, each with a distinct yet complementary role. You might, therefore, launch one container as a database back-end, another as a file server, and a third as a web server.
Docker
As I explore in one or two of my Pluralsight courses, a Docker container is an image whose behavior is defined by a script. The container is launched as a software process that’s cunningly disguised as a server.
But what’s an image? It’s a software file containing a snapshot of a full operating system file system. Everything necessary to launch a viable virtual server is included.
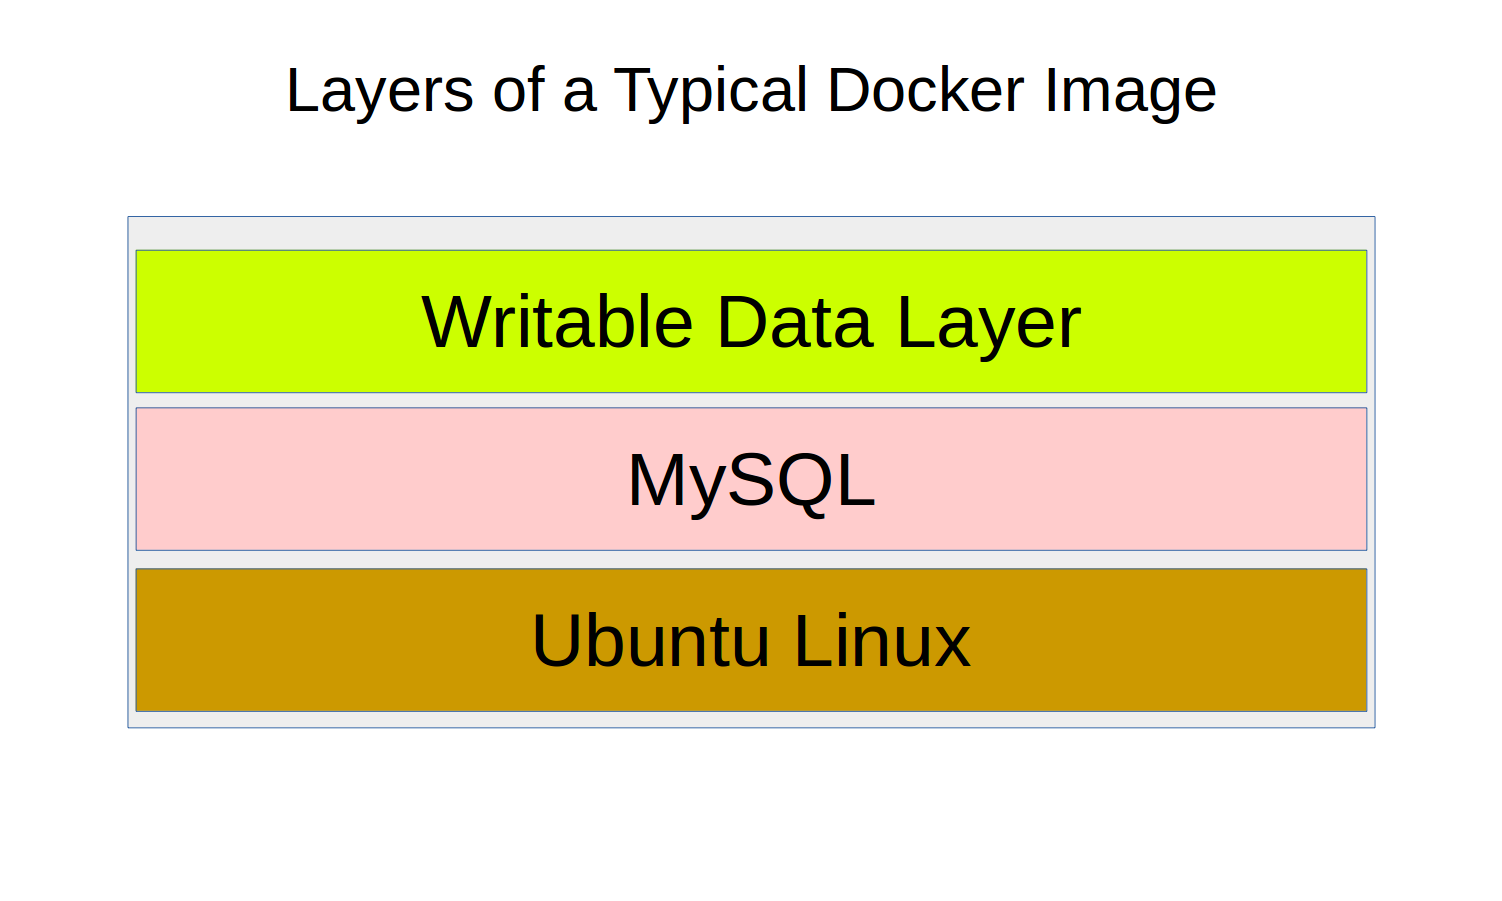
An image might consist of just a base operating system like Ubuntu Linux, or the tiny and super-fast Alpine Linux. But an image could also include additional layers with software applications like web servers and databases. No matter how many layers an image has and how complicated the relationships between them might be, the image itself never changes.
When, as shown in the next figure, an image is launched as a container, an extra writable layer is automatically added into which the record of any ongoing system activity is saved.
What do folks commonly do with their Docker containers? Often, they’ll load up some kind of app development project to test how it will work, and then share it with team members for feedback and updates. When the app is complete, it can be launched as a cluster of containers (or “swarm” as Docker calls it) that can be programmatically and instantly scaled up or down according to user demand.
While Docker is a Linux-based technology and requires a Linux kernel to run, running remote or even local Docker containers on Mac or Windows machines is possible through either the Docker for Mac or Docker for Windows apps or for older machines, through the Docker Machine tool.
Cloud computing
Cloud computing is the provision of on-demand, self-service compute,
memory, and storage resources remotely over a network.
Since cloud-based services are billed in very small increments, you can
quickly configure and launch a wide range of projects. And since the
resources are all virtual, launching them as part of an experiment or to
solve some short-term problem will often make lots of sense. When the
work’s all done, the resource is shut down.
Cloud platforms let you do things that would be impossible — or impossibly
expensive — anywhere else.
Unsure how long your project will run or how much demand it will attract?
Perhaps purchasing, building, and housing all the expensive hardware you’d need to properly support your project in-house can’t be justified.
Investing heavily in server, cooling, and routing equipment might just not
make sense.
But if you could rent just enough of someone else’s equipment to match
fast-changing demand levels and pay only for what you actually use, then
it might work.
AWS
There’s no shortage of ways to manage Docker containers on AWS. In fact, between frameworks, orchestration interfaces, image repositories,
and hybrid solutions, the variety can get confusing.
This article won’t dive deeply into every option, but you should at least be aware of all your choices:
Amazon’s EC2 Container Service(ECS) leverages specially configured EC2 instances as hosts for integrated Docker containers. You don’t have to get your hands dirty on the EC2 instance itself, as you can provision and administrate your containers through the ECS framework. ECS now offers greater abstraction (and simplicity) through their Fargate mode option.
AWS CloudFormation allows you to configure any combination of AWS resources into a template that can be deployed one or many times. You can include specified dependencies and custom parameters in the template. Given its self-contained and scriptable design, CloudFormation is a natural environment for Docker deployments. In fact, Docker itself offers its Docker for AWS service (currently in beta), that will automatically generate a CloudFormation template to orchestrate a swarm of Docker containers to run on AWS infrastructure within your account.
AWS Elastic Beanstalk effectively sits on top of ECS. It allows you to deploy your application across all the AWS resources normally used by ECS, but with virtually all of the logistics neatly abstracted away. Effectively, all you need in order to launch a fully scalable, complex microservices environment is a declarative JSON-formatted script in a file called Dockerrun.aws.json. You can either upload your script to the GUI or, from an initialized local directory using the AWS Beanstalk CLI.
Amazon Elastic Container Service for Kubernetes (EKS) is currently still in preview. It’s a tool allowing you to manage containers using the open source Kubernetes orchestrator, but without having to install your own clusters. Like ECS, EKS will deploy all the necessary AWS infrastructure for your clusters without manual intervention.
Docker for AWS is, at the time of writing, still in beta. Using its browser interface, you can use the service to install and run a “swarm of Docker Engines” that are fully integrated with AWS infrastructure services like auto scaling, load balancing (ELB), and block storage.
Docker Datacenter (now marketed as part of Docker Enterprise Edition) is a joint AWS/Docker project that provides commercial customers with a more customizable interface for integrating Docker with AWS, Azure, and IBM infrastructures.
Docker Cloud, much like Docker Datacenter, offers a GUI, browser-based console for managing all aspects of your Docker deployments. This includes administration for your host nodes running in public clouds. The big difference is that, unlike Datacenter, the Docker Cloud administration service is hosted from its own site. There’s no server software to install on your own equipment.
Docker Hub is probably the obvious first place to look for and to share Docker images. Provided by Docker itself, Docker Hub holds a vast collection of images that come pre-loaded to support all kinds of application projects. You can find and research images on the hub.docker.com web site, and then pull them directly into your own Docker Engine environment.
EC2 Container Registry(ECR) is Amazon’s own image registry to go with their EC2 Container Service platform. Images can be pushed, pulled, and managed through the AWS GUI or CLI tool. Permissions policies can closely control image access only to the people you select.
I think you’re ready to start. If you haven’t yet, do head over to the
Amazon Web Services site to create an AWS account. In case you’re not
yet familiar with how this all works, new accounts get a generous full year
of experimentation with any service level that’s eligible for the Free Tier.
Assuming you’re still in your first year, nothing we’re going to do in this
course should cost you a penny.
Next, we’ll pop the lid off Docker and see how it works at its most basic level: your laptop command line. Technically, this has very little relevance to AWS workloads, but it’ll be a great way to better understand the workflow.
Introduction to Docker
Properly visualizing how all the many AWS parts work will probably be
easier if you first understand what’s going on under the hood with Docker
itself. So in this article I’ll walk you through launching and configuring
a simple Docker container on my local workstation.
Ready to go?
The Docker command line
Let’s see how this thing actually works. I’m going to get Docker up and running on my local workstation and then test it out with a quick hello-world operation. I will then pull a real working Ubuntu image and run it.
I won’t go through the process of installing Docker on your machine here for a few reasons. First of all, the specifics will vary greatly depending on the operating system you’re running. But they’re also likely to frequently change, so anything I write here will probably be obsolete within a short while. And finally, none of this is all that relevant to AWS. Check out Docker’s own instructions at docs.docker.com/install.
Along the way I’ll try out some of Docker’s command line tools, including creating a new network interface and associating a container with it. This is the kind of environment configuration that can be very useful for real-world deployments involving multiple tiers of resources that need to be logically separated.
Most Linux distributions now use systemd via the systemctl command to handle processes. In this case systemctl start docker will launch the Docker daemon if it’s not already running. systemctl status docker will return some useful information, including in-depth error messages if something has gone wrong. In this case, everything looks healthy.
# systemctl start docker
# systemctl status docker
That’s the only Linux-specific bit. From here on in we’ll be using commands that’ll work anywhere Docker’s properly installed.
Launch a container
Running commands from the Docker command line always begins with the word “docker”. The normal first test of a newly installed system is to
use docker run to launch a small image — the purpose-built “hello-world” image in this case.
As you can tell from the output below, Docker first looked for the image on the local system. Docker is particularly efficient in that way. It will always try to reuse locally available elements before turning to remote sources.
In this case, since there are no existing images in this new environment, Docker goes out to pull hello-world from the official Docker library.
$ docker run hello-world
Unable to find image ‘hello-world:latest’ locally
latest: Pulling from library/hello-world
ca4f61b1923c: Pull complete
Digest: sha256:66ef312bbac49c39a89aa9bcc3cb4f3c9e7de3788c9
44158df3ee0176d32b751
Status: Downloaded newer image for hello-world:latest2.1.
Hello from Docker!
This message shows that your installation appears to be
working correctly. To generate this message, Docker took the
following steps:
1. The Docker client contacted the Docker daemon.
2. The Docker daemon pulled the “hello-world” image
from the Docker Hub. (amd64)
3. The Docker daemon created a new container from that
image which runs the executable that produces the output you
are currently reading.
4. The Docker daemon streamed that output to the Docker client,
which sent it to your terminal.
To try something more ambitious, you can run an Ubuntu container
with:
$ docker run -it ubuntu bash
Share images, automate workflows, and more with a free Docker ID:
https://cloud.docker.com/
For more examples and ideas, visit:
https://docs.docker.com/engine/userguide/
The full output of this command includes a useful four part description of what just happened. The Docker client contacted the Docker daemon which proceeded to download the hello-world image from the repository. The image is converted to a running container by the docker run command whose output is streamed to our command line shell — the Docker client.
Let me break that jargon down for you just a bit:
- Docker client — the command line shell activated by running docker
commands - Docker daemon — the local Docker process we started just before
with thesystemctlcommand - Image — a file containing the data that will be used to make up an
operating system
Typing just docker will print a useful list of common commands along
with brief descriptions, and docker info will return information about
the current state of our Docker client.
Notice how we’ve currently got one container and one image (the hello-world container) and that there are zero containers running right now.
$ docker info
Containers: 1
Running: 0
Paused: 0
Stopped: 1
Images: 3
Server Version: 1.13.1
Storage Driver: aufs
Root Dir: /var/lib/docker/aufs
Backing Filesystem: extfs
Dirs: 28
Dirperm1 Supported: true
Logging Driver: json-file
Cgroup Driver: cgroupfs
Plugins:
Volume: local
Network: bridge host macvlan null overlay
Interactive container sessions
Let’s try out the “more ambitious” docker run -it ubuntu bash command that the Docker documentation previously suggested. This will download the latest official base Ubuntu image and run it as a container.
The -i option will make the session interactive, meaning you’ll be dropped into a live shell within the running container where you’ll be able to control things like you would on any other server. The -t argument will open a TTY shell.
$ docker run -it ubuntu bash
Unable to find image ‘ubuntu:latest’ locally
latest: Pulling from library/ubuntu
1be7f2b886e8: Pull complete
6fbc4a21b806: Pull complete
c71a6f8e1378: Pull complete
4be3072e5a37: Pull complete
06c6d2f59700: Pull complete
Digest: sha256:e27e9d7f7f28d67aa9e2d7540bdc2b33254
b452ee8e60f388875e5b7d9b2b696
Status: Downloaded newer image for ubuntu:latest
root@c81a051f6f03:/#
Note the new command line prompt root@c81a051f6f03:/#. We’re
now actually inside a minimal but working Docker container.
We can, for instance, update our software repository indexes .
# ls
bin dev home lib64 mnt proc run srv tmp var boot etc lib media opt root sbin sys usr
# apt update
Get:1 http://security.ubuntu.com/ubuntu xenial-security InRelease
Get:2 http://archive.ubuntu.com/ubuntu xenial InRelease
[…]
Fetched 24.8 MB in 48s (515 kB/s)
Reading package lists… Done
Building dependency tree
Reading state information… Done
6 packages can be upgraded. Run ‘apt list — upgradable’ to
see them.
If I exit the container, it will shut down and I’ll find myself back in my host server. Typing docker info once more now shows me two stopped containers rather than just one.
$ docker info
Containers: 2
Running: 0
Paused: 0
Stopped: 2
Images: 4
[…]
Running containers in the background
I could launch a container in the background by adding the detach=trueoption which will return a container ID. Listing all active docker containers with ps will then show me my new running container.
$ docker run -it --detach=true ubuntu bash
232a83013d39254657d743864ea46105319b0c1a239bc61e82cf
7833554bd82f
$ docker ps
CONTAINER ID IMAGE COMMAND CREATED STATUS NAMES
232a83013d39 ubuntu “bash” 27 sec ago Up 26 sec wizardly_pasteur
Managing containers
As you can see from the wizardly_pasteur name, the people who designed Docker compiled a rather eccentric pool of names to assign to your containers. If you’d like to rename a container — perhaps so managing it will require less typing — run docker rename, followed by the current container name and the new name you’d like to give it. I’ll run docker ps once again to show the update in action.
$ docker rename wizardly_pasteur MyContainer
$ docker ps
CONTAINER ID IMAGE COMMAND CREATED STATUS NAMES
232a83013d39 ubuntu “bash” 3 minutes ago Up 5 minutes MyContainer
docker inspect followed by a container name, will return pages and pages of useful information about that container’s configuration and environment. The output snippet I’ve included below displays the container’s network environment details. Note that the network gateway is 172.17.0.1 and the container’s actual IP address is 172.17.0.2 — that will be useful later.
$ docker inspect MyContainer
[...]
            "Gateway": "172.17.0.1",
            "GlobalIPv6Address": "",
            "GlobalIPv6PrefixLen": 0,
            "IPAddress": "172.17.0.2",
            "IPPrefixLen": 16,
            "IPv6Gateway": "",
            "MacAddress": "02:42:ac:11:00:02",
            "Networks": {
                "bridge": {
                    "IPAMConfig": null,
                    "Links": null,
                    "Aliases": null,
[...]
Docker networks
docker network ls will list all the network interfaces currently associated with our Docker client. Note in particular the bridge interface which connects a container to the Docker host, allowing network communication into and out of the container.
$ docker network ls
NETWORK ID          NAME            DRIVER        SCOPE
fa4da6f158de        bridge          bridge        local
18385f695b4e        host            host          local
6daa514c5756        none            null          local
We can create a new network interface by running docker network createfollowed by the name we’d like to give our new interface. Running inspectagainst the new interface shows us — through the Driver value — that this new interface has been automatically associated with the network bridge we saw earlier, but exists on its own 172.18.0.x network. You’ll remember that our default network used 172.17.0.x.
$ docker network create newNet
715f775551522c43104738dfc2043b66aca6f2946919b39ce
06961f3f86e33bb
$ docker network inspect newNet
[
    {
        "Name": "newNet",
 [...]
        "Scope": "local",
        "Driver": "bridge",
        "EnableIPv6": false,
        "IPAM": {
            "Driver": "default",
            "Options": {},
            "Config": [
                {
                    "Subnet": "172.18.0.0/16",
                    "Gateway": "172.18.0.1"
 [...]
]
Confused? My Solving for Technology book has a chapter on basic TCP/IP networking.
Moving containers between networks
You might sometimes want to move an existing container from one network to another — perhaps you need to reorganize and better secure your resources. Try it out by moving that Ubuntu container to a different network, like the newNet interface we just created. Use docker network connect followed by the network name newNet and then the container name MyContainer.
$ docker network connect newNet MyContainer
Running inspect on the container once again will show you that MyContainer is now connected to both the bridge interface with its 172.17.0.2 address, and the newNet interface on 172.18.0.2. It’s now like a computer with two network interface cards physically connected to separate networks.
Don’t believe me? You can successfully ping both interfaces from the command line, so we can see they’re both active. All this was possible, by the way, despite the fact that the container was up and running all along. Don’t try that on a physical machine!
$ ping 172.17.0.2
PING 172.17.0.2 (172.17.0.2) 56(84) bytes of data.
64 bytes from 172.17.0.2: icmp_seq=1 ttl=64 time=0.103 ms
64 bytes from 172.17.0.2: icmp_seq=2 ttl=64 time=0.070 ms
^C
 — — 172.17.0.2 ping statistics — -
2 packets transmitted, 2 received, 0% packet loss, time 999ms
rtt min/avg/max/mdev = 0.070/0.086/0.103/0.018 ms
$ ping 172.18.0.2
PING 172.18.0.2 (172.18.0.2) 56(84) bytes of data.
64 bytes from 172.18.0.2: icmp_seq=1 ttl=64 time=0.079 ms
64 bytes from 172.18.0.2: icmp_seq=2 ttl=64 time=0.062 ms
^C
 — — 172.18.0.2 ping statistics — -
2 packets transmitted, 2 received, 0% packet loss, time 999ms
rtt min/avg/max/mdev = 0.062/0.070/0.079/0.011 ms
Working with Dockerfiles
While containers can be defined and controlled from the command line, the process can be largely automated through scripts called Dockerfiles. Running Dockerfile as part of a docker build operation will tell Docker to create a container using the configurations specified by the script.
In the simple dockerfile example displayed below, the FROM line tells the docker host to use Ubuntu version 16.04 as the base operating system. If there isn’t already an Ubuntu 16.04 image on the local system, Docker will download one.
# Simple Dockerfile
FROM ubuntu:16.04
RUN apt-get update
RUN apt-get install -y apache2
RUN echo “Welcome to my web site” > /var/www/html/index.html
EXPOSE 80
Each of the RUN lines launches a command within the operating system whose results will be included in the container — even before it’s actually launched as a live virtual machine.
In this case, apt-get update updates the local repository indexes to permit software downloads, apt-get install apache2 will download and install the Apache webserver package. The -y will automatically answer “yes” to any prompts included in the installation process.
The echo command will replace the contents of the index.html file with my customized Welcome text. index.html is, of course, the first file a browser will look for and then load when it visits a new site.
Finally, EXPOSE 80 opens up port 80 on the container to allow HTTP traffic — necessary because this will be a web server. This will allow us to access the web server from the Docker host machine. It’ll be your responsibility to provide access to your host for any remote clients you might want to invite in.
If you’re up on the latest Ubuntu package management news, you’ll know that there’s been a shift away from apt-get to its new apt replacement. So why did I use apt-get in that Dockerfile? Because it’s still more reliable for use in scripted settings.
To actually create a container based on this Dockerfile, you run docker buildwith -t to create a name (or “tag”) for the container. I’ll go with webserver. You add a space and then a dot to tell Docker to read the file named Dockerfile found in this current directory. Docker will immediately get to work building a container on top of the Ubuntu image we pulled earlier, and running the apt-get and echo commands.
$ docker build -t “webserver” .
Sending build context to Docker daemon 2.048 kB
Step 1/5 : FROM ubuntu:16.04
16.04: Pulling from library/ubuntu
Digest: sha256:e27e9d7f7f28d67aa9e2d7540bdc2b33254b452ee8e
60f388875e5b7d9b2b696
Status: Downloaded newer image for ubuntu:16.04
 — -> 0458a4468cbc
Step 2/5 : RUN apt-get update
 — -> Running in c25f5462e0f2
[…]
Processing triggers for systemd (229–4ubuntu21) …
Processing triggers for sgml-base (1.26+nmu4ubuntu1) …
 — -> 3d9f2f14150e
Removing intermediate container 42cd3a92d3ca
Step 4/5 : RUN echo “Welcome to my web site” >
/var/www/html/index.html
 — -> Running in ddf45c195467
 — -> a1d21f1ba1f6
Removing intermediate container ddf45c195467
Step 5/5 : EXPOSE 80
 — -> Running in af639e6b1c85
 — -> 7a206b180a62
Removing intermediate container af639e6b1c85
Successfully built 7a206b180a62
If I run docker images, I’ll now see a version of my Ubuntu image with the name webserver.
$ docker images
REPOSITORY TAG IMAGE ID CREATED SIZE
webserver latest 7a206b180a62 3 minutes ago 250 MB
ubuntu 16.04 0458a4468cbc 12 days ago 112 MB
hello-world latest f2a91732366c 2 months ago 1.85 kB
Now we’re ready to launch the container using docker run.
Structuring this command properly is a bit of a delicate process and there’s a lot that can go wrong. The -d argument tells Docker to run this container detached, meaning we won’t find ourselves on the container’s command line but it will be running in the background. -p tells Docker to forward any traffic coming on port 80 (the default HTTP port) through to port 80 on the container. This allows external access to the web server. I can’t say that I understand why, but the order here is critical: only add the -p argument after -d.
Next, we tell Docker the name of the container we’d like to launch, webserverin our case. And after that, we tell Docker to run a single command once the container is running to get the Apache webserver up.
$ docker run -d -p 80:80 webserver \
 /usr/sbin/apache2ctl -D FOREGROUND
Perhaps you’re wondering why I didn’t use the more modern Systemdcommand systemctl start apache. Well I tried it, and discovered that, at this point at least, systemd is good and broken in Ubuntu Docker containers. Stay away if you know what’s good for you. -D FOREGROUND ensures that Apache — and the container as a whole — will remain running even once the launch has completed. Run it for yourself.
We’re given an ID for the new container, but nothing else. You can run docker ps and you should see our webserver among the list of all running containers. You should also be able to open webserver’s index.html page by pointing your browser to the container’s IP address.
What’s that? You don’t know your container’s IP address? Well, since the container will have been associated with the default bridge network, you can use docker network inspect bridge and, within the Containers section of the output, you should find what you’re after. In my case, that was 172.17.0.3.
Working with Docker Hub images
We’ve already enjoyed some of the benefits Docker Hub has to offer. The images we used to build the containers on the previous clips were all seamlessly downloaded from Docker Hub behind the scenes.
In fact, using something like docker search apache2, you can manually comb through the repository for publicly available images that come with Apache pre-installed. You can also browse through what’s available on the Docker Hub web site.
However, you should remember that not all of those images are reliable or even safe. You’ll want to look for results that have earned lots of review stars and, in particular, are designated as “official.” Running docker search ubuntureturns at least a few official images.
Find something that interests you? You can add it to your local collection using docker pull. Once the download is complete, you can view your images using docker images.
$ docker pull ubuntu-upstart
While you’re on the Docker Hub site, take the time to create a free account. That’ll allow you to store and share your own images much the way you might use a tool like GitHub. This is probably the most popular use-case for Docker, as it allows team members working remotely — or lazy devs working in the same office — to get instant and reliable access to the exact environments being used at every stage of a project’s progress.
Those are the bare-bone basics, and it’s important to understand them clearly. But, because of the complexity involved in coordinating clusters of dozens or thousands of containers all at once, most serious container workloads won’t use those particular command line tools.
Instead, you’re most likely going to want a more robust and feature-rich framework. You can read about some of those tools — including Docker’s own Docker Swarm Mode, Docker Enterprise Edition, or Docker Cloud, and Kubernetes — in my article, “Too Many Choices: how to pick the right tool to manage your Docker clusters”.
This article is largely based on video courses I authored for Pluralsight. I’ve also got loads of Docker, AWS, and Linux content available through my website, including links to my book, Linux in Action, and a hybrid course called Linux in Motion that’s made up of more than two hours of video and around 40% of the text of Linux in Action.